Week Five
Click the Arrow to Proceed to Project Page
Click the Arrow to Proceed to Project Page
Nap Pod Prototyping Round 2, ShopBot


The process: Now that I have my initial prototype of the nap pod printed, I have a basic idea of the shape that I'm aiming for. The next step is to scale the prototype up. This week we were charged with the task of building something big using the shopbot. Initially my intention was to create a life-sized pod for testing. When I ran this idea by John and Tom in the shop, though, they were not so thrilled about this idea and recommended that I try a half-sized pod to save on time and material. Turns out even creating a half-sized pod was a rather large time investment on a machine that was heavily booked this week.

Method:
I talked to Santiago, a PhD student in my lab and former designer, and he recommended that I start with a existing chair to ensure that my pod would actually be comfortable for a user. I did some searching on amazon and settled on a chair that seemed portable, comfortable, and affordable.

I used the SolidWorks model from last week, and scaled it up to accomodate a person on the lounge chair. Ideally in the final version, I would cover this in foam and other comfortable materials to create the impression of loungy indulgence rather than cold, plastic seating. I would also attach the chair as an integrated part of the pod, but for this week, I wanted to create a light-weight structure to test the mechanical issues for this technique. I settled on foam as a material as it is light and would assist in the process of insulating the pod from sound.
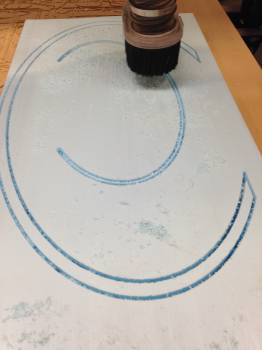
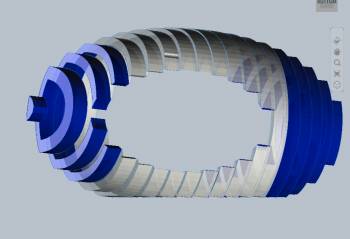
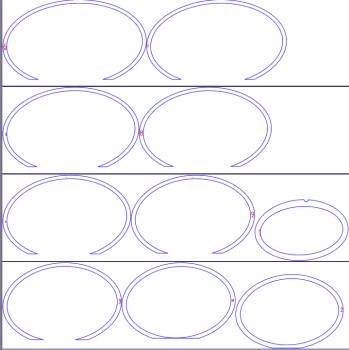
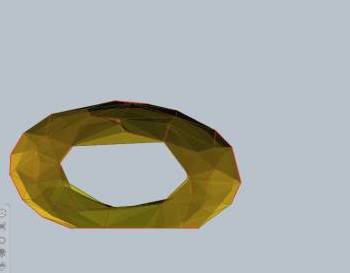
Based on the work of Pip and Travis, I decided to use Autodesk 123DMake to slice up my 3D oval into pieces that I could cut out and glue together to create a shape. I was able to import and .stl file from Solidworks and choose the Stacked Slices in the Construction Techniques menu. This lead to all sorts of errors as the default page size for material is 8.5 " x 11" and my piece was initially supposed to be 6.5' across. Somehow, when my piece imported, it was presumably over 1000inches, which was not my intention. When using the stacked slices feature, I ran into quite a few initial problems where the program thought the piece was too large for the material. At one point, John recommended that I lie to the program and come up with an arbitrary material size for the sake of creating the pattern I needed. Ultimately, I changed the material parameters to be 96" x 24 " x 2" to reflect the size of the foam, though ultimately I had to alter this as well to reflect the fact that John had precut the foam to be 4 feet long instead of 8. I played around with the cut direction under the slice direction menu. I found that some directions resulted in a better visual cut, but would require up to ten sheets of material and over thirty parts, which did not seem feasible. Some cut direcions tried to split the rings of the nap pod into multiple pieces, which would present the added challenge of having to glue the pieces together on a piece-by-piece basis in addition to having to glue all of the assembled pieces together. I decided not to go with that option. Autodesk outputs a nice plan of each piece and allows you to run through the assembly steps to see how they come together. Tom had recommended that I put a hole in all of the pieces to allow me to put a dowel through the line up the pieces when assembling them. I initially had incorporated this into my model, but when I scaled my model down (to about 40" in length), somehow the holes got messed up. I would later realize that Tom was completely correct, and lining pieces up without this was quite a struggle.
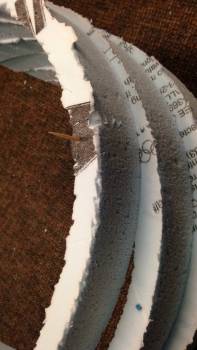
As you can see from the screen above, there were numerous blue pieces, indicating that the pieces did not actually connect. This was another issue that I had not foreseen: due to the thickness of the foam, certain pieces simply would not connect when sliced as there was no overlap between the pieces. I attempted to alter this by manually resizing some pieces, but I only had moderate success, causing issues during assembly.
This lead to one key lesson: NOTHING IS TRIVIAL.
I had assumed that using Autodesk to slice up my shape would not be a rate limiting step, but it actually took me a few hours to get the output I had been looking for, and even then it was not perfect. Ultimately I was able to produce the following pattern.
Some notes about the Shop bot:
Drill pieces down
Use fillets to get "square" corners
Set origin as bottom left corner
X is along the bench, which is kind of counterintuitive
Interior shapes = pocket tool path
Exterior = profile
Keep material z on top left corner
Do not exceed tool size with pass depth ( usually want two passes)
Step over = how muh tool moves between rows to move along
DON'T TRUST EXISTING SHOPBOT SETTINGS- even if you select the right piece, people may have changed it. For foam: 1/4" spindle, 6,000 rpm
200 feed rate
75 plunge rate
Foam has very little resistance to being cut.
Open initial file in Pathworks, set toolpaths, Save as sbp and vcarve file
Then open shop bot 3
Hit reset or the computer will not talk to the machine.
Manually input 10.0 for 10000 rpm on the shopbot, or 6 for 6,000 rpm.
Zero z to top of material using the C2 program under cuts. Zero the z in the middle of the material, c2
Zero x, y to where you set origin , want tool to be half over table and half over material
Zero menu, x zero
Use conventional, not climb
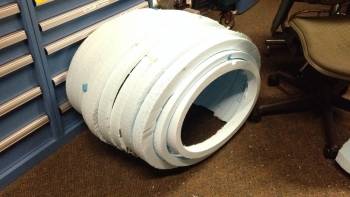
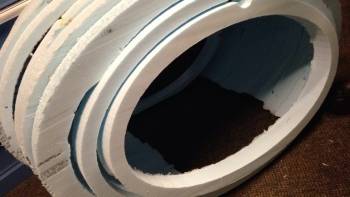
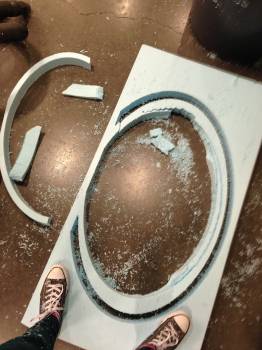
Initially I had the cut depth set to 2" to reflect the thickness of the foam, but this was actually not deep enough, so I changed it to 2.1". I used three passes (2/3" each time), and I cut on the line. Some pieces didn't cut all the way through, so I adjusted this as I went. Also, some pieces were too thin and really did not come out correctly (the spindle essentially just milled a hole in that region because the pieces were too small). I layered some pieces inside eachother to save time and material, so overall the actual cutting process did not take too long.
There was also one instance in which I had not put in enough screws to effectively hold down the foam pieces, so the piece shifted during cutting and the foam cracked in the middle of my piece. So it is important to ensure that you adequately attach the piece to the sacrificial layer.
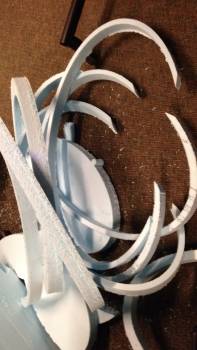
Foam sucks.
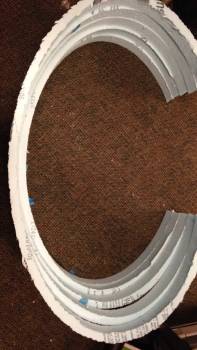
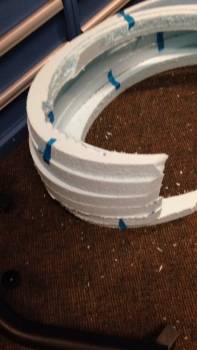
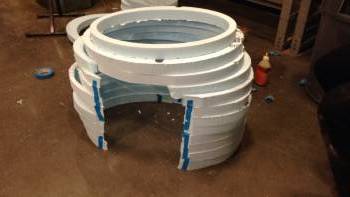
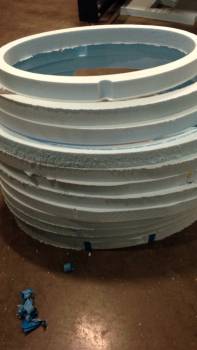
Foam sheds everywhere, so cutting and cleaning was a long process. I ended up vacuuming the area four or five times and making Tom very sad. Foam is also very flexible, which proved to be both useful and destructive. I was able to fudge the structure a bit to get pieces to fit together, but the assembly had almost no structural integrity. I also found that the pieces were too thin, assembled which gave them too many degrees of freedom and again made the structure questionable. I had some issues identifying which piece belonged where, so I assembled the structure with tape first.


New ideas.
- dowel - inflatables - foldable - casting/molding foam - fabric - sliding mechanism for doors, analogous to drawers
Serious shot out to both of the Julianas, Jonathan, Dan, Kevin, Tom and John in the shop, Pip, Edwina, and Novy for all of their help, guidance, ideas, and support.